Polish Friends

Thursday, March 17, 2011

HAPPY St. Pattys DAY!!! *throws confetti & chugs a green beer*

Happy St. Pattys Day you guys!!! I was able to finally get my hands on Nars Zulu at a decent price yay me! It's a GORG dark green jelly *sigh*, so pretty and shiny. What better time to use it then for today's mani :) Again I wanted to use my craft scissors, and thsi is what I came up with.

I started with 2 coats if Zulu and a coat of SV


Then I chose these scissors


and this is how it cuts the tape


I was going for a semi-half moon mani, but with a little twist. So this is how I taped my nails off


I used China Glaze Laser Lime for the semi-half moons


As you may notice, I FINALLY opened a Twitter account, so you can now also keep up with my blog on there. YAY. The linky thing is on the left hand side of the page.

Wednesday, March 16, 2011

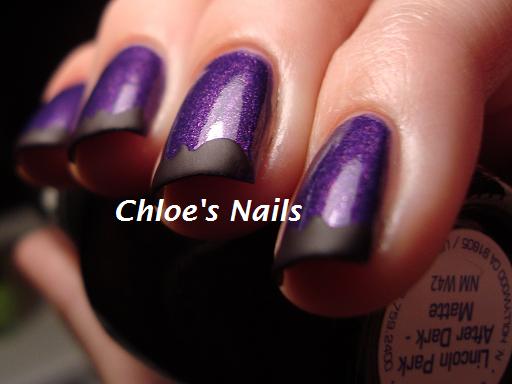
A crafty Funky French..

Okay so here is the funky french I had scheduled for yesterday, using the craft scissors I purchased. I still have so many ideas with these scissors!! Since there isn't much to say, here it is.

I started with Zoya Savita


Then I added a top coat, since Savita is a matte. I could have just used a regular purple, but I love how the Zoya mattes look with a top coat!


Then using the scissors, I cut my tape. Just look how perfect it cuts it!


I then added a fave of mine, OPI Lincoln Park After Dark Matte, after I laid my tape down.


finally I added SV on top, cause I wanted this mani completely shiny.


Tuesday, March 15, 2011

Birds of a feather flock together, Feather Mani..... (giveaway sneak peek)

Okay, I know I told you I would post another craft scissor mani, and I promise I had a funky french one scheduled, but after I completed this, i wanted to show you guys so bad! So the funky french will be tomorrow mornings post :) Hope you guys don't mind. Once I saw this mani, I knew I HAD to try and replicate it! This is in no way my idea, I saw it here first. It was just so fun and I loved the look of it. I'm always up for trying new things, and love a challenge. 

While at the craft store where I got my scissors, I saw this feather patch thingy, and thought it would be perfect for this. It was hard finding small enough feathers that I thought would work right. Anyways, okay this is what the feather patch looked like
and since I couldn't remember for the life of me, what she used to apply her feathers, I just grabbed some clear Elmer's glue and a pack of brushes. I could have used actual nail glue, but that stuff can be sooo damaging.
Well holy cow, I know it was my first time, but it was harder than I thought, but totally worth it! I ended up only doing this for accent nails, lol. I also have an issue with things being as perfect as I can get them, and there are quit a few issues I can see that bother me with this one, but I still LOVE LOVE LOVE this.

What I did, was paint a fairly thick layer of the glue onto my nail, and trimming the feather, as close as I could see, placed it onto my nail with tweezers, lightly pressing it down. I then added some more glue to my brush and did a coat over the entire feather and nail. Then when it was mostly dry, I went around with clippers, and clipped as much of the excess off the sides and tips that I could. Then when that was done, I did 2 coats of SV. It is perfectly smooth and shiny. Since I only did one nail on each hand, the rest of the mani is Brucci Blackened Emerald.
So what do you guys think? Have any of you tried it? I got soooo many compliments it was crazy.

Now I first wanted to thank you all for your feedback about the giveaway, and since the majority said 'more winners', that's what it will be, but instead of 4......I actaully had 25 polishes, so it will be 5 winners!! I still need to get the details and everything worked out, but here is a peak at what I have for you guys. Oh and NO these are NOT in any kind of order or group, I just placed them together and took pics.

Monday, March 14, 2011

Let's get crafty! and a Giveaway question.

Since I'm always trying to come up with fun ways to use tape, while I was in a craft store, I saw these, and wondered why I never tried these!! These work PERFECT, and I already have the next 3 days scheduled, of manis I did with them, lol. Here are the ones I picked up, and the you can see the designs they make on the side of them. They were only $1.99 a each!!
For this mani, I started out with Sinful Black on Black
Then I decided to use this pair first :)
I just cut the tape in half, and this is what it looked like


Then taping off my nail, I added China Glaze Recycle


Then taping them off again, I added Nubar Reclaim! I'm addicted to these scissors now!


Oh and you might see some leftover glue on my middle finger, haha, I was def feeling crafty, and couldn't get all the glue off!  Ooohhh, I can't wait for you guys to see the others!!!


Okay, now I have been collecting a few polishes here and there, about 20, and am ready to host my first giveaway very soon. I would like your advice though. Would you guys prefer it to be a 1 winner giveaway, and that 1 person wins it all, 2 giveaways - that the first winner gets to pick like 10 and the 2nd winner gets the other 10, or 4 winners - with me separating the polishes into 4 sets of 5, and starting with winner 1, they can pick which set, then winner 2 can pick the next set and so on? Hope that makes sense, lol. Since this is for you guys, I would love to hear your opinions. Oh and yes, this will be open to EVERYONE :P
TIA!
XOXO Erika

Sunday, March 13, 2011

Diamond Rays

I had this on my wish list a loooong time ago and a lovely lady from MUA, contacted me, and offered to swap, so YAY. I Love all the OPI DS polishes, and even though this isn't as holo as others, it's still so pretty. You can semi see the holo glitter in it, but it would have been a lot better if I was able to catch the sun. For this I layered 1 coat of Sinful Black on Black to start.


Then taping off my nails, I then added another coat of SInful Black on Black. I love how it appears to be diamond rays!! Oh and yes, I do see that I only did 3 rays on my middle finger, haha, not sure how I missed the 4th ray *shrug*


Saturday, March 12, 2011

Illamasqua's Spring/Summer 2011 Toxic Nature Collection

Morning everyone!! Well, after much arguing with hubby and my bff/neighbor, I went to the dr. ps. I HATE the dr. It's sort of an anxiety I have, I don't know it's weird, anyways, I have Bronchitis *sigh* At least I got my antibiotics. Okay enough of that, on to some fun.

While being home sick, I got a surprise package from Illamasqua, I had no idea what it was, but I discovered it's 3 of the new polishes from Toxic Nature!!!!! Alex from Illamasqua, was so sweet to send these to me for my review. I was soooo excited, and of course, coughing my brains out, attempted my swatches, lol, and after about 300 pictures later, I finally finished. You should have seen the blurry messes I took while coughing. Now, some pics are taken in different lighting, I was trying my hardest to capture the true color, but since two are neons, my camera had issues.

According to the paper I got with them, these are available as of March 10th in the US, and in UK stores March 17th. There are a total of 5 in the collection:

Purity - Peach
*Bacterium - Pearlescent Ash Ochre
*Radium - Acidic Lime Shimmer
Stagnate - Grey Mauve
*Gamma - Neon Orange

* - these are the 3 I received

I also loved their photos they did for this collection. 
Now, I only owned 1 Illamasqua polish before this, but I really love their bottles and their formula is among the best out there. It goes on so easy with minimal effort

Okay onto the pics finally!!
2 coats of Bacterium. This is my fave of the 3, although there are semi brush strokes, I don't care, it's such a unique color, and that's what I love!


Radium, this is soooo bright, that my camera has a hard time with neons :( There was no sun today either, so maybe tomorrow I will post some sunlight pics, if we get any. The shimmer in this is beautiful, and trust me, it's much brighter in person.

This is in direct light


This was taken away from the light

Outside, with no sun :(


Gamma, now I'm not a huge orange fan, but I love it. It really is neon, so once again, my camera was angry, lol. Maybe tomorrow, if there is sun, I'll try again, but again, WAY brighter in person.

In direct light


away from the light


Alright guys I'm off to bed, hopefully. *prays to the coughing gods, please let me be for 1 night*